How to move from 1Password to Secrets
Export from 1Password, import into Secrets, check your work and clean up. About twenty minutes, and there is one file you must not leave lying around.

Updated November 2026. The screenshots are from 2022, so some screens will look a little different now. The steps are the same.
Moving house is a pain, and moving your passwords sounds like it should be worse. It isn’t. 1Password lets you take everything out in one file, and Secrets reads that file directly. Give yourself about twenty minutes and a cup of something warm. Come along.
(A quick note if you’re new here: Secrets is our hosted password manager. It runs Vaultwarden, an open-source server that works with the official Bitwarden apps, which is why you’ll see the name Bitwarden on a few screens below.)
Step 1: Create your Secrets account
You need somewhere to move to. Pick a plan on the Secrets page, and after checkout follow the get started guide to set your master password.
Step 2: Export from 1Password
You’ll need the 1Password desktop app on a Mac, Windows or Linux computer for this.
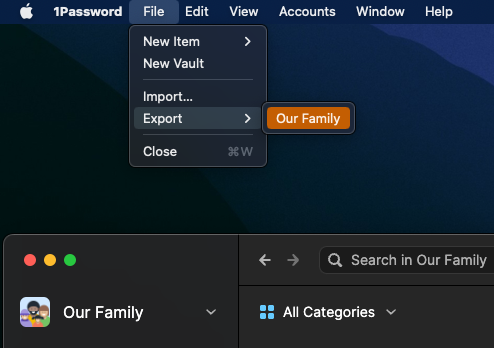
- On a Mac: choose
File, thenExportin the menu bar, and pick the account you want to export. - On Windows or Linux: click the three dots at the top of the sidebar, then
Export, and pick the account.
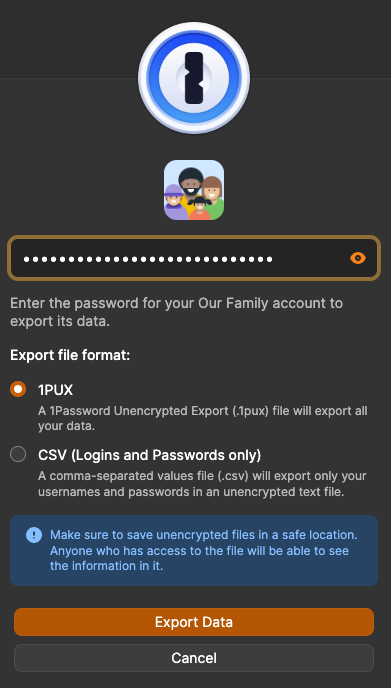
Enter your 1Password account password and choose the 1PUX format. (1Password also offers CSV, but CSV only carries logins and passwords, and only some of their fields. 1PUX carries everything.)
Save the file somewhere you’ll find it again, like your Desktop.
Now, please read this bit twice. That file is not encrypted. 1Password says so plainly: exported files “are stored in plaintext.” Every password you own is sitting in it, readable by anyone who opens it. Don’t email it to yourself, don’t drop it into a cloud folder, and don’t wander off to make lunch. We’re going to use it in the next step and then delete it.
Step 3: Import into Secrets
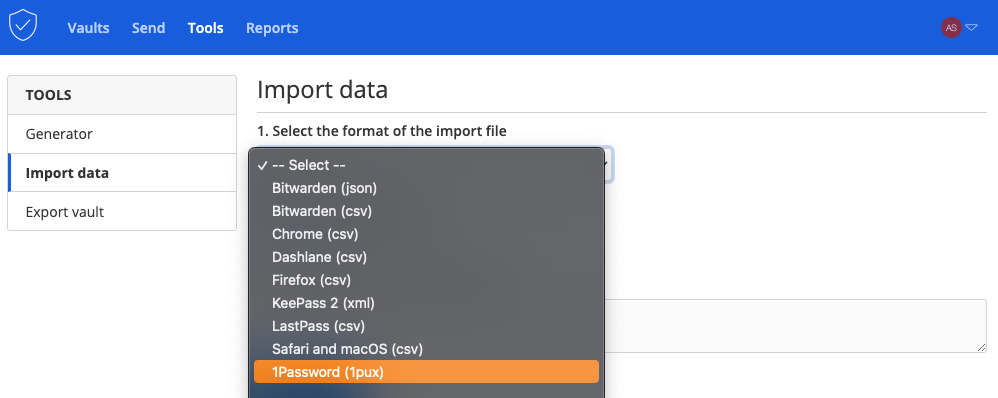
Log in to the Secrets web vault at secrets.ayamsecure.com. Go to Tools, then Import data. Choose 1Password (1pux) as the file format, select the file you just saved, and click the import button.
One thing to know: the importer doesn’t check for duplicates. If you run it twice, you’ll get two of everything. So run it once.
Step 4: Check your work
Don’t cancel anything yet! Have a look around your new vault first.
- Is the number of items roughly what you had in 1Password?
- Open five or six logins you use every day. Username there? Password there? Website address there?
- Try logging in to one real website with the Bitwarden browser extension. (Not installed yet? Here’s how.)
- Check the unusual items: secure notes, credit cards, and anything with a file attached. If something didn’t come across, add it by hand now, while you can still open 1Password and look.
If you use passkeys, check those too. 1Password’s own export page says passkeys can only be exported from their iPhone and Android apps for now, so a passkey may not be in the file you just imported. The simple fix is to log in to that website and create a new passkey there, saved in Secrets.
Step 5: Clean up
Two things to do, in this order.
First, delete the export file. Put it in the trash and empty the trash. Remember, it’s every password you have in plain text.
Then, when you’re ready, close your 1Password account. There’s no rush. I’d keep both running side by side for a week or two, until you’ve stopped reaching for the old one. When that day comes, 1Password explains how to delete your account. Deleting it is permanent, which is why we checked our work first.
Onwards
That’s the whole move. Next up, have a read of how to use Secrets to get the browser extension and the phone apps set up.
And if the import throws an error or something looks off, write to me. We’ll sort it out.
Cheers,
Jay